


Beginner Snowboarding Tips - How to Snowboard & What to Bring
So you’re going snowboarding for the first time. Maybe you’ve looked forward to this for years, maybe you just booked a snowboard vacation at the last minute. Either way, prepare for the ride of your life and read on for some beginner snowboard tips.
It’s hard to beat the thrill of a great day on the slopes, but the learning curve for beginner snowboarders can be steep. Unlike some sports, at first, snowboarding can be very counterintuitive. So we’ve put together this comprehensive guide of snowboard tips for beginners to get you started as a boarder, from how you prepare the night before, to your first turns on the bunny hill, to your first blue runs.
How to Prepare For a Day Snowboarding
When it comes to your first day snowboarding, forethought is the key to happiness. Anything that you can plan ahead will save you time and money, and make learning to ride that much smoother. So here’s a few things you can do ahead of time to set yourself up for success.
Buy Your Lift Ticket Online
More and more ski resorts are offering online ticket sales, often at a slight discount. Buying your ticket online ahead of time can save you a lot of time and hassle. If you plan on skiing several days, 2-5 day ticket bundles can save you some money as well. The Ikon Session pass, for example, is a great way to test out the waters at a few different resorts.
No one wants to wait in a long line in the cold first thing in the morning. So shop online and beat the rush.
Make Your Reservations
Many resorts have started requiring parking and/or lift reservations to combat overcrowding. Find out if your local resort requires advanced reservations so you don't get turnaround at the mountain. Some resorts also charge for parking now but waive the fees if you carpood, so you can save money by planning ahead.
Shop for Beginner Snowboard Packages
Ski resorts want to help get you snowboarding in the hopes that you'll fall in love with the sport and keep coming back. Many hills offer discounted packages that include a lift ticket, gear rental, and a lesson. These beginner snowboard packages are always your best option when first trying the sport. They’re designed to help you progress to intermediate snowboarding with as little hassle as possible, for the lowest price possible. Take advantage of them.
How to Figure Out Your Snowboard Stance
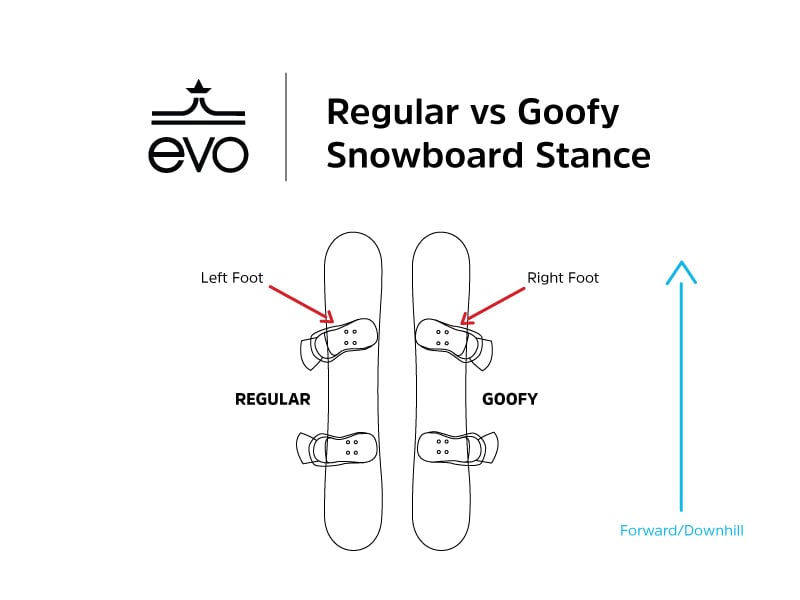
Because you go down the mountain sideways on a snowboard, you’ll have to choose which foot will be your lead foot, just like on a skateboard, wakeboarders, or surfboard. This is referred to in snowboarding as your stance, with two options, regular and goofy. Knowing which stance you are ahead of time will speed up your board setup at the mountain, and help you get started making turns more naturally.
A regular stance has your left foot facing forwards, where a goofy snowboard stance has your right foot facing forward. Neither one is right or wrong, it just depends person to person. About 70% of riders are regular, and about 30% are goofy. One simple way to figure out if you should ride regular or goofy is by which foot you’d choose to kick a ball with. That foot will be in the back when you snowboard. For example, if you’d choose to kick with your right foot, you are regular - left foot, goofy.
What to Wear Snowboarding
Look good, feel good. That old mantra applies to snowboarding too. Sure, you can just wear your normal winter clothes, but you’re going to feel out of place, and they’ll be less comfortable over a long cold day.
For many first time riders, their outfit ends up being the weak link that makes their day miserable. Be prepared, and you won’t end up with cold fingers and toes that force you to go home early. We’ve put together a complete guide to beginner snowboard clothing tips here, but here’s a breakdown of the basics.
- Bring more clothes than you think you need. You don’t lose anything by stockpiling a few warm layers, and extra gloves in your car, and you could end up being really grateful you did.
- Don’t Wear Cotton Skiing. There’s an old adage in the outdoor world “cotton kills.” That’s because when cotton clothes get wet, either from snow, or sweat, they take forever to dry out, and they lose all of their insulation. So you end up cold and wet immediately. Don’t wear anything cotton. Instead wear wool or synthetic socks, underwear, and insulating layers.
- Dress for the Chairlift. Often snowboarders dress like they would to go sledding or ice skating. That’s a bad idea. For those sports you’re moving most of the time and stay naturally warmer. As a boarder, you’ll spend a lot of time on the chairlift. That means you’ll be sitting out in the cold, off the ground, potentially with a cool breeze blowing. Wear warm enough clothes that you’d be comfortable sitting still outside. You will be.
What to Bring Snowboarding
Snowboarding is a sport unlike any other, and as such, it can be hard to make sure you’ve packed everything you need. And it really sucks to finally get to the hill and realize you forgot something. So here’s a quick checklist for the car.
- Snowboarding clothes & extra layers
- Snowboard (if you’re not renting at the mountain)
- Snowboard Boots (if you’re not renting at the mountain)
- Wallet
- Lift ticket confirmation (if you purchased online)
- Snowboard goggles
- Spare gloves
- Face mask
- Snacks
- Water
- Dry change of clothes for the drive home
When You Arrive at the Mountain
In the Parking Lot
If you brought your own snowboard boots to the resort, put them on in the lot. They’re comfortable to walk in, and will keep your feet dryer on the walk than normal shoes. Pro tip: store your boots in your car on the way to the resort so they don't freeze in your trunk.
It’s always a good idea to plan on being self-sufficient once you leave your car. That way, if it’s a long way from the lodge to the parking lot you don’t have to make multiple trips and waste your day. So make sure you’re good to go at the car. Make sure you’ve got your wallet and lift ticket in secure, zippered pockets. Make sure you’ve got your snacks and a small water bottle. Because it’s cold, people often forget to drink enough water, and end up really dehydrated. And make sure not to lock your keys inside it.
At the Base Area
Always take care of your lift ticket first. If you purchased it online, there should be a note on where to go to redeem it - don’t get in the general lift ticket line if you don’t have to. Once you’ve got your ticket, put it on your snow pants, not your jacket. If it warms up through the day, you may want to take your jacket off, but if your ticket is on it, you can’t.
The people who give you your ticket can point you toward the gear rental shop. Once there, be patient with the person helping you pick gear. They have a lot of experience helping new snowboarders, so listen to their advice.
Should You Take A Snowboard Lesson?
Once you’ve got your gear, we highly recommend that you sign up for a lesson. Sure, you can figure out how to ride on your own, but it takes a long time, and involves crashing, a lot. Instead, we highly recommend that everyone take a beginner snowboard lesson. You’ll learn the fundamentals in a controlled environment, and save yourself a lot of pain.
In addition to providing specialized coaching to help you master the fundamentals, taking a lesson is also a great way to learn your way around the mountain and figure out what sort of runs you are capable of. Lessons are built around the idea of progression: growing throughout the day in your confidence and skills as a snowboarder. Instructors are really good at picking terrain and techniques that will push your ability in a safe environment and make you a better rider. Even if you’ve snowboarded a few days in the past, a lesson to start the day is always a good idea.
If lessons are out of budget, there are plenty of helpful Youtube videos with beginner snowboard tips and tricks to get you started. Cell service can be spotty on the mountain though, so you may not be able to watch these at the resort and will want to watch them beforehand.
How to Get On and Off Chairlifts on a Snowboard
Chairlifts are one of the most intimidating parts of snowboarding, but they don’t need to be. The most important thing is to pay attention in the lift line. There’s a structured pattern to how people load the lift, and if you pay attention it will make a lot more sense. If you take a lesson, your instructor will help make sure you’re prepared to ride the lift. If you’re still worried, you can always let the attendant know that this is your first time. They can help make sure you get where you’re supposed to be, and can even slow down the lift as you load to make it less intimidating.
First, always make sure to unstrap your back foot before you get in line. This makes it much easier to skate around, and you should practice skating around a flat area before progressing to the chairlift. If you’re wearing a backpack, slide it onto one shoulder or put it in front of you so that it doesn’t hit the chair.
Shuffle up to the loading line on the ground and look back over your shoulder as the chair comes toward you. Sit down on it and point your front foot forward, lifting your foot so the snowboard edges don't catch.
Resting your board on your boots is a sure way to kill your boots quickly, since the snowboard edge will cut into the soft boot material. Instead, use your unstrapped foot to catch the back of the unstrapped binding beneath the highback and take a little weight off your other leg.
When getting off the chair, make sure to lift the restraining bar when you see signs as you near the top. Keep the tip of your board up as you near the loading dock, and as you slide past the line on the ground, stand up and let the chair gently push you down the ramp. Use your front foot to steer, and let your back foot rest between your bindings. Glossy snowboard tops can be slippery, so make sure to plant your back foot firmly.
Pay attention to where the chair is behind you, some chairs rotate really fast and can hit you in the backside. Once you’re off the lift, shuffle a little ways and pull over to get ready for your run.
How to Snowboard - Basic Technique Tips for Beginner Snowboarders
You’ve got the gear, you’ve got your ticket, you’re ready to ride the lifts, what comes next? The fun part of course! At its core, snowboarding is all about making turns to control your speed down a hill. Turns don’t just change the direction you’re going, they slow you down too. If you take a lesson, your instructor will go over all of this with you, but if you don’t, here’s some tips for beginners to keep in mind.
How to Turn on a Snowboard
Making turns on a snowboard requires a special rhythm led by your front foot, followed back your back foot. You need to roll your hips so that you pressure your front foot into the turn first, then your back foot immediately tilts in and follows. Eventually that timing will become natural, but when you’re starting out, it’s important to weight the front foot as you start to lean into the turn, and then consciously weight the back foot to bring you through.
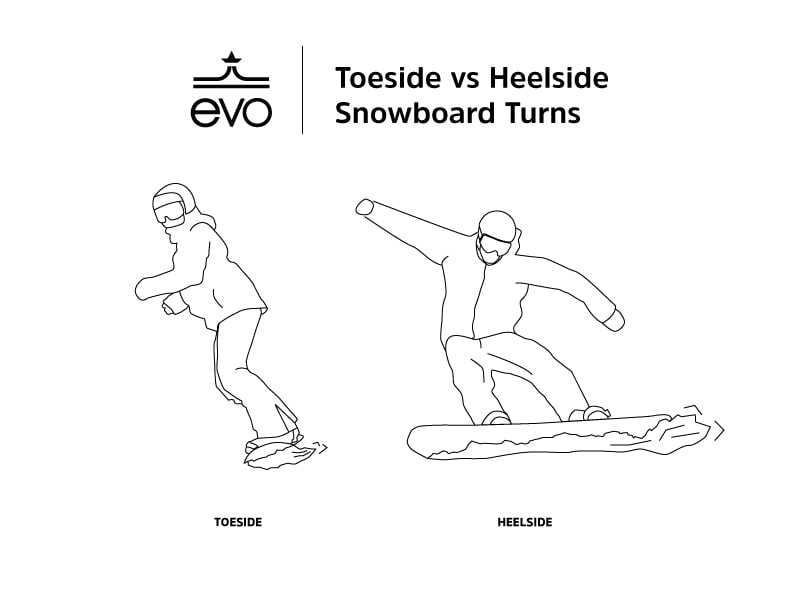
Toeside vs Heelside Snowboard Turns
Many snowboarders figure out how to ride the heelside edge of their board really quickly. It’s only natural to lean back when you’re going down something steep, after all. It’s tempting to just stop there and weave down the slope making only heelside turns.
Unlocking toeside turns is your ticket to exploring the whole mountain. Toeside turns are a little more scary, but they’re really important, and most advanced riders actually become stronger at turning toeside than heelside.
The key is to weight that front foot first as you lean into the turn. Find your toeside edge with your front foot, and then roll your back ankle over to follow. Many beginner snowboarders try to jam both feet onto the toeside edge at the same time, which leads to hard crashes. Take it easy and flex the board, letting it do the work.
How to Stop on a Snowboard
Going faster than you’re comfortable with on a snowboard is easy. Stopping is the hard part. Before you leave the bunny hill you need to learn how to stop on both your toe and heelside edges. Stopping is just a more aggressive turn that instead of just slowing you down, brings you to a complete stop with your board across the slope. To stop you want to pivot your board and body aggressively across the slope, putting all your weight on the uphill edge. You might fall down the first few times you try it, but eventually you’ll figure out the right balance and be able to stop safely in any situation.
Invest in a Beginner Snowboard Package
If you loved your first time snowboarding, get yourself ready for more riding with a beginner snowboard package. Our packages are designed to get you everything you need for less, and skipping the rental process will save you time that you could be riding.
The best beginner snowboard will be relatively easy to flex and a twin shape - this means that it looks the same on both ends, so you can ride in either direction. You'll want snowboard boots and bindings that are slightly softer as well, because they will be more forgiving of errors.Shop Women's Snowboard PackagesShop Men's Snowboard Packages
Tips to Stay Comfortable Throughout the Day Snowboarding
- Wear sunscreen. Even if it’s overcast, any sun will reflect up from the snow and burn your nose and face. It’s a good idea to put on sunscreen at the beginning of the day and at lunch.
- Keep your phone warm. Cold kills phone batteries. Store your phone in a zippered pocket inside your jacket to keep it warm. That way you won’t miss that special photo because your phone is dead.
- Keep your goggles off your forehead. When you go inside the lodge it’s tempting to hang out with your goggles up on your forehead. If you do, they will fog and never clear up. The sweat from your skin foggs them up. Instead take them all the wayt off and hang them from a hook in the lodge.
- Call it quits before you think you’re too tired to keep riding. Most injuries happen at the end the of the day when you’re tired and just trying to get that “one more run.” Stop skiing while you’re still having fun, save your legs for another day.
It can be intimidating to try a new sport, especially one like snowboarding that has a lot of special equipment. But if you follow these beginner snowboard tips you can avoid most of the major headaches that new riders run into. So get out there and make some turns!
Learn More With Our Other Snowboard Guides:
Snowboards - Snowboard Buyers Guide
Snowboards - Snowboard Rocker Explained
Snowboards - Kids' Snowboards Size Chart
Snowboards - How to Choose a Freestyle Park Setup
Snowboards - How to Choose Snowboard Shapes
Asymmetrical Snowboard Shapes
Snowboard Boots - How to Choose & Fit
Snowboard Boots - How to Put on & Fit
Snowboard Bindings - How to Choose & Compatibility
Snowboard Bindings – How To Set Up
How to Wax a Snowboard
Outerwear - What to Wear Snowboarding
Outerwear - How to Wash & Waterproof
Outerwear - Regional Snowboard Guide
Goggles - How to Choose
Goggles - Wearing Goggles with Glasses
Helmets - How to Choose & Fit Guide
Gloves & Mittens - How to Choose
Socks - How to Choose Snowboard Socks
Footbeds - How to Choose
Snowboarding - How to Get in Shape
Travel - How to Fly with Snowboards
Splitboarding - How to Get Started
Splitboarding - Board and Binding Weight Chart
Avalanche Probes - How to Choose
Backcountry - Choosing an Avalanche Airbag Pack
Backcountry - Choosing an Avalanche Beacon
Backcountry - Climbing Skins Size Guide
Backcountry - How to Choose an Avalanche Shovel
Backcountry - How to Choose Climbing Skins
Backcountry Backpacks - How to Choose
Backcountry Basics - How to Get Started
This is evo. We are a ski, snowboard, wake, skate, bike, surf, camp, and clothing online retailer with physical stores in Seattle, Portland, Denver, Salt Lake City, Whistler, and Snoqualmie Pass. Our goal is to provide you with great information to make both your purchase and upkeep easy.
evo also likes to travel to remote places across the globe in search of world-class powder turns, epic waves, or legendary mountain biking locations through evoTrip Adventure Travel Trips. Or, if you prefer to travel on your own, check out our ski & snowboard resort travel guides and mountain bike trail guides.
Still have questions? Please call our customer care team at 1.866.386.1590 during Customer Care Hours. They can help you find the right setup to fit your needs.