


How to Trim or Cut Ski & Splitboard Climbing Skins
Trimming ski & splitboard climbing skins can take a little patience and attention to detail, so don’t save it for the last minute. There's nothing worse than cutting your skins in the parking lot and ending up slipping off sidehills and dragging a whole bucket of snow up the skin track with you. Your friends will not be impressed. Take the time to do the job right and you'll thank yourself later when you're gliding up the mountain on perfectly tailored skins.
Precut Climbing Skins
For starters, not all skins need to be trimmed. Many ski and snowboard brands offer skins that are tailor made to fit certain models perfectly. This is especially common with splitboards and dedicated backcountry skis like the Black Crows Freebird line or many of Dynafit’s offerings. If this is the case for the skins you bought, congratulations! You’re all done trimming your skins! Close this page and go hit the skin track, you magnificent creature.
If you don’t fall into the above category and your skins’ shape doesn’t yet match your planks, you’ll need to trim them down to size. You should always follow the instructions that come with your climbing skins, because they vary from each manufacturer, but we'll give you a general outline to help you get the job done right.
Trim-to-Fit
With trim-to-fit skins, you will either have to adjust both length and width, or just the width. For skins that need to be trimmed in both directions, you will have to attach the tip hardware yourself once you get the skin down to the right length. Either way, the goal is to cover all of the plastic base material with the skin, but leave the metal edges showing. The key area where you want wall-to-wall coverage is from just in front of the toepiece to about a foot behind your heel, so if theres a bit of base showing near the tips and tails, it's no big deal. Skins that are too narrow under your feet (with strips of base showing) will slip backward more easily on off-camber tracks or hard packed snow. Skins that are too wide (the edges are covered) will not hold an edge well on sidehills or icy traverses.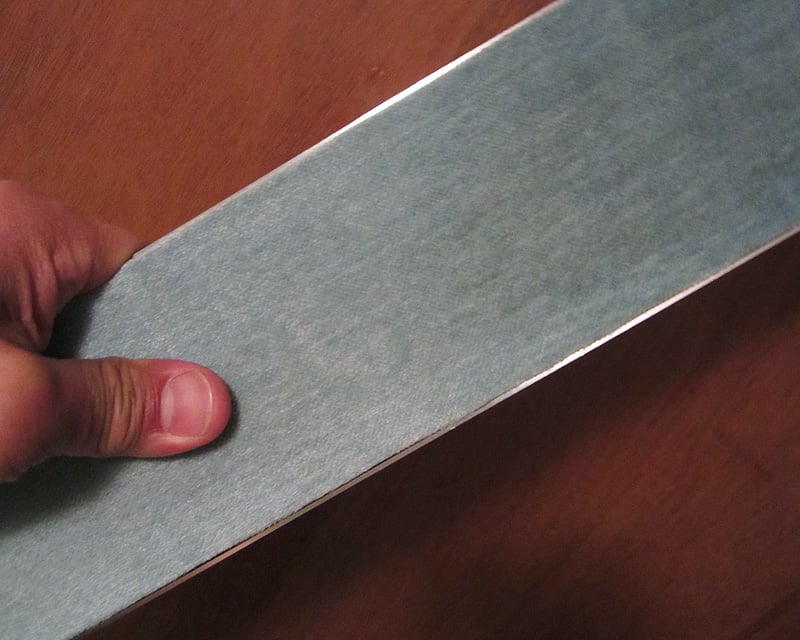
How to Trim Climbing Skins
Climbing skins may seem intimidating at first, but it's actually quite a simple process. Plus, snow, especially powder, is forgiving, so it's not the end of the world if you end up off by a couple of millimeters here or there. That said, there are a couple of important things to remember when cutting your ski or splitboard climbing skins. First, is fitting them to the right length, and second, leaving your edges exposed. If your skins are loose, they can fall off and get snowy, which means they won't stick to your bases. Likewise, you'll want to keep your edges exposed so you have a good grip when you're going across a slope, there are different tools and methods to help with this process, these are described below.
- Cut the skin to length and attach the tip hardware, per the manufactures instructions, if the hardware is not preinstalled.
- Adjust the tail hardware to the length of your ski or splitboard so the skin is tight against the entire base.
- Attach the skin fully to the ski or splitboard, with tip and tail hardware engaged.
- Cut along the edges of the ski or splitboard, from tip to tail, pressing firmly and evenly. Work in one long smooth cut to avoid wavy edges.
- You're all set, now go earn some turns!
Exposing Your Edges & Offset Cutters
There are two main types of cutters that will come with your skins. Black Diamond skins come with a cutter that has a blade in line with the plastic guide. Pomoca and G3 skins come with a cutter that has the blade offset a few milimeters from the plastic guide. The different cutters will effect the trimming process slightly. When using a non-offset cutter like the one from BD, you will need to move the skin around between cuts in order to end up with exposed edges. Before making your first cut, set up the skin so that it is roughly 2 millimeters off center on the ski, and cut along the more overhanging side. For the next cut, move the skin so that you can just see the metal edge plus another edge width of base (about 2mm) on the side you just cut. Then cut along the overhanging side. For offset cutters, this process is not necessary. You can just center the skin and cut both sides to achieve perfectly tailored skins with full coverage and exposed edges.More Tips and Tricks
- For Black Diamond skins and others where you have to attach the tip hardware, it’s a good idea to cut a nice tapered shape from the front contact point of the ski to the tip hardware to keep snow from building up at the ends. It’s often easier to just make this cut with a strong pair of scissors.
- If you have access to a ski vice, it can be very helpful to put your ski in it when trimming. This will allow you to use both hands to apply smooth and consistent pressure.
- The offset cutters can sometimes be a bit tricky to start the cut with at the tip of the ski. It can help to start the first quarter inch or so with a knife or razorblade, giving the cutter a notch to bite in to.
- When cutting splitboard skins, you will often be able to avoid cutting one side entirely. Before trimming, try to line up your skin so that the metal of the straight inner edge is exposed (if you’re using a Black Diamond style, non-ffset cutter, you will need the metal edge plus about 2 mm of exposed plastic). If you can do this, just trim the curved outer edge to size and you’ll be good to go. If you cant get it to work, no worries, just cut both edges same as you would with a ski.
- If you run into trouble and end up with a poorly cut or wavy edge, you can smooth it out by moving the skin over to a cutting board or other clean, hard surface and re-trimming it with an X-ACTO knife and metal straightedge.
We recommend that backcountry travelers take an AIARE Level One class or equivalent and practice the skills they learn there regularly with their partners. Here are some great resources for avalanche safety education:
— American Institute for Avalanche Research and Education
— American Avalanche Association
— Northwest Weather and Avalanche Center
— Avalanche Canada
You should carry an avalanche beacon, shovel and probe when travelling in avalanche terrain and know how to use them. Backcountry travel requires an acceptance of the risks involved (avalanches are not the only danger) and implies a willingness to take responsibility for educating oneself about these dangers and ways to mitigate them.
Learn More With Our Other Backcountry Guides:
Backcountry Basics - How to Get Started
Splitboarding - How to Get Started
How to Skin for Backcountry Travel
How to Trim or Cut Climbing Skins
Backcountry Gear Checklist
How to Choose Alpine Touring Skis
How to Choose Alpine Touring Ski Boots
How to Choose Alpine Touring Bindings
Getting Started with Dynafit (Tech) Bindings
How to Choose Climbing Skins
Climbing Skins Size Guide
Climbing Skins Weight Chart
How to Dress for Backcountry Skiing & Snowboarding
This is evo. We are a ski, snowboard, wake, skate, bike, surf, camp, and clothing online retailer with physical stores in Seattle, Portland, Denver, Salt Lake City, Whistler, and Snoqualmie Pass. Our goal is to provide you with great information to make both your purchase and upkeep easy.
evo also likes to travel to remote places across the globe in search of world-class powder turns, epic waves, or legendary mountain biking locations through evoTrip Adventure Travel Trips. Or, if you prefer to travel on your own, check out our ski & snowboard resort travel guides and mountain bike trail guides.
Still have questions? Please call our customer care team at 1.866.386.1590 during Customer Care Hours. They can help you find the right setup to fit your needs.