


How to Choose a Dropper Seatpost for Your Mountain Bike
- What is a dropper seatpost?
- How to choose the right dropper seatpost?
- What size dropper post do you need?
- How to ride with a dropper seatpost?
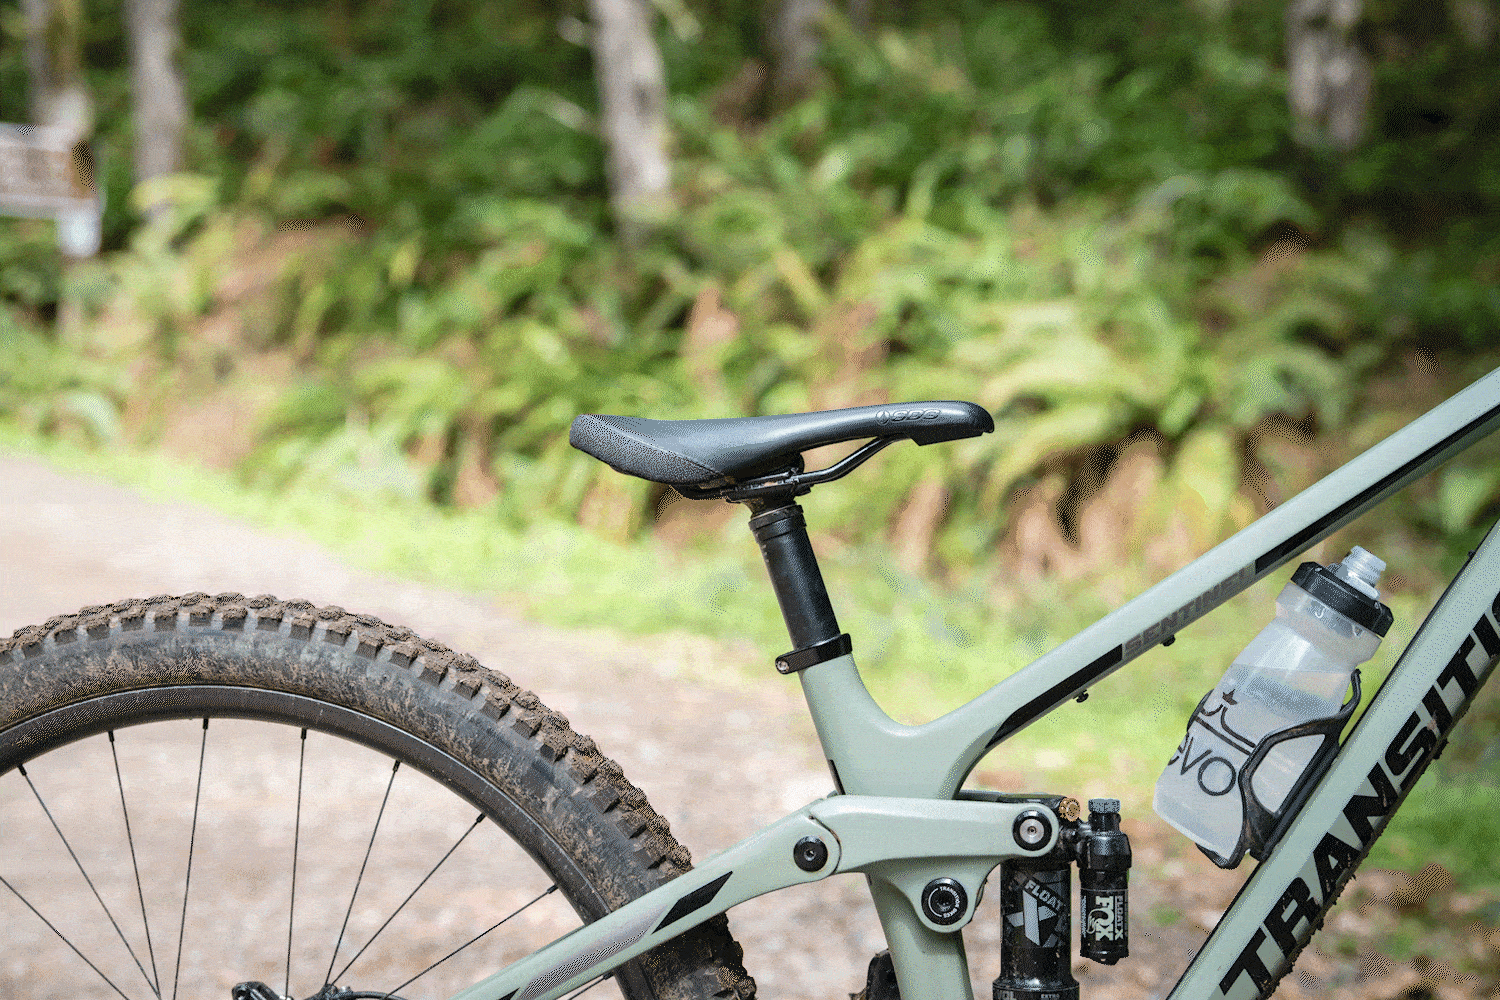
Dropper seatposts, or popularly referred to just as dropper posts, are one of the best upgrades you can make to any mountain bike. The awesome on-the-fly adjustment you can make to the height of your seat will have you questioning why you didn’t buy a dropper post years ago. With a remote actuation that mounts on the handlebars, these seatposts allow riders to change the height of their seat without getting off their bike. No more messing with quick release clamps, or even more annoyingly, fishing out a multitool from your disheveled pack. If you're considering making the upgrade, there are several important factors to consider when choosing the right dropper post for your bike.
Compatibility & Fit
Travel
Internal vs. External Routing
Mechanical vs. Hydraulic vs. Electronic
Setting up a Dropper Post
Riding with a Dropper Post
Compatability & Fit
Seat Tube Diameter
Seatposts come in several different diameters, and dropper posts are no different. It is essential to choose the right diameter of dropper post that corresponds to the diameter of your bike frame’s seat tube, or it will not fit on your bike. You can find the diameter of your seatpost by pulling out your current seatpost and looking for a number printed or stamped into it, or by looking at the specs of your bike online.The most common seatpost diameters for mountain bikes are 30.9mm and 31.6mm, but 27.2mm (usually road) and 34.9mm exist too.
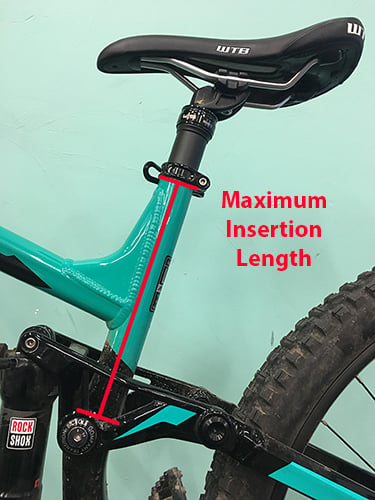
Insertion Length
The next important step in choosing a correctly sized dropper post is the overall length and insertion length. The overall length is simply how long the post is when it is fully extended, and insertion length dictates how far into the frame the dropper post extends. These measurements are important for several reasons. 1) you want your dropper post to fit you, the rider, and 2) your dropper post has to fit into your bike’s seat tube.As bike geometry has evolved over the years, seat tubes have gotten shorter, and bends in the tube have become more common, so the insertion length is important to make sure a dropper post is compatible with your frame. Likewise, all dropper posts will have a minimum insertion length, dictating how far into the frame the post must sit in order to avoid damaging the internals or breaking the post.
Travel
The travel measurement of a dropper post dictates how far the post can extend. To choose the correct travel dropper post, measure from the seatpost collar to the seat rail (in your climbing, or highest setting) on your current bike. Subtract 50mm from this measurement and the resulting number is the maximum travel length dropper post you can comfortably run. Too much travel can put the seat height too high, even when climbing.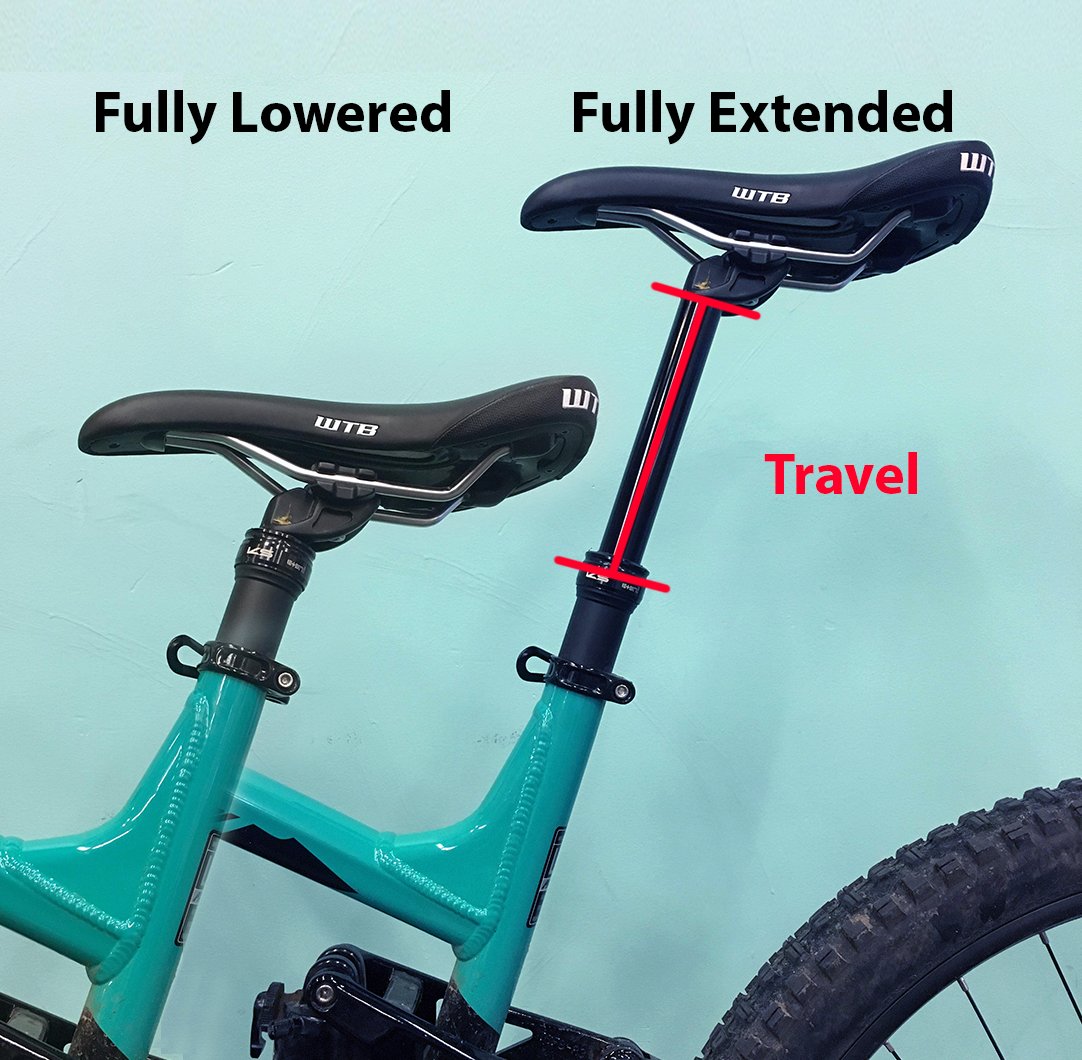
Features
Cable Routing: Internal vs External
Dropper seatposts use cables to connect the lever or remote on your handlebars to the seatpost itself. There are two ways that these cables get from the bars to the post, internal (inside of your bike’s frame) or external. Some bikes are setup for internal, or “stealth” routing, which helps reduce clutter on the bike and reduces the chances of anything getting snagged. Meanwhile, externally routed dropper posts are easier to setup and service.Note: You cannot run an internal (i.e. "stealth") routing dropper post with a bike frame that is not specifically equipped for internal cable routing.
Mechanical vs Hydraulic vs Electronic:
Dropper posts are actuated either mechanically, hydraulically, or electronically. Each system has its pros and cons. Mechanical dropper posts are often the most simple and the cheapest upfront, as well as easiest to service. Hydraulic actuation droppers offer smoother performance but servicing requires bleeding the line, much like hydraulic disc brakes. Electronic dropper posts offer a nice closed system and clean routing, however, they are the most expensive.Setting up a Dropper Post
Once you’ve chosen your new dropper post, it’s time to install it on your bike. You can bring it into a shop, like any of our evo locations, or do this yourself. The process is fairly straightforward, although setting up internally routed cables can be frustrating (think threading a needle, but through your bike frame). Import things to pay attention to here are the position of the remote and the length of the cables. When properly installed, the seatpost at full extension should be at your preferred seat height for climbing.Next, find the most comfortable place on the handlebars for your dropper remote. The easier it is to use, the more you’ll be able to take advantage of it. With front derailleurs becoming less common as a result of better 1x drivetrains, many riders opt to place their dropper remote on their handlebars near where their front shifter used to be.

Tips for Internally Routing Cables
- Use a Magnetic Pickup Tool or Drain Snake: These flexible tools help guide the cable through the frame. Magnetic tools allow you to simply reach the tool into your seat tube and pull the cable back out. Run the metal cable through first (if it’s a mechanically actuated dropper post), using it to guide the outer cable through. You can find either of these tools at a hardware store.
- Drop a string in the top cable port near the headtube, dropping it as far as you can. Then take a vaccum to suck out the thread. Use this thread to pull the dropper post cable back through.
Riding With a Dropper Post
- Fully extended, your dropper seatpost should be in a good natural climbing position, this means having your knees just slightly bent in the bottom of your pedal stroke. This allows you to get the most efficiency while climbing.
- When you encounter technical obstacles, and downhill sections this is when a dropper post shines. Dropping your seat when descending allows you to get the seat out of the way, and to get your weight lower as well as further back.
- Any other time when you may want more maneuverability in bike handling, like on a rough section (even if it's flat), or cornering is a good time to drop your post and get that seat out of the way so that you can move more freely.
- Lastly, show off the amazing from-the-saddle convenience as much as you can, especially if you're riding with friends who have yet to make the upgrade!
Need a tune up? Bring your bike in for maintenance at any of our flagship locations for assistance:
Learn More With Our Other Bike Guides:
How to Choose a Mountain Bike
Mountain Bike Sizing and Fit Guide
How to Get Started Mountain Biking
How to Choose a Mountain Bike Wheel Size
Mountain Bike Suspension Basics
Women's Mountain Bike Buyer's Guide
How To Get Started Gravel Biking
Electric Mountain Bike Buyer's Guide
Classes of eBikes
Travel Guides - Where to Mountain Bike
Travel Guides - Where to Ride eBikes
Mountain Bike Cockpit Setup & Seat Height
How to Choose a Mountain Bike Dropper Post
How to Choose Mountain Bike Tires
How to Choose Mountain Bike Handlebars
How to Choose Mountain Bike Pedals
How to Choose Clipless Pedals, Shoes & Cleats
How to Choose a Bike Seat / Saddle
Women's Mountain Bike Gear & Clothing Guide
How to Choose MTB Knee Pads
Bike Helmet Size & Fit Guide
How to Choose Bike Shoes
Shimano Groupset Hierarchy Explained
SRAM Groupset Hierarchy Explained
SRAM vs Shimano Groupsets Compared
What to Bring Mountain Biking
What to Wear Mountain Biking
Mountain Bike Tire Pressure Guide
Mountain Bike Maintenance Schedule
How to Clean a Mountain Bike
How to Change Bike Pedals
How to Bleed SRAM Brakes
How to Bleed Shimano Brakes
How to Convert to Tubeless Tires
How to Replace Internal Cable Housing
How to Adjust Your Rear Derailleur
How to Replace a Bike Chain
How to Fix Bike Creaks & Noises
This is evo. We are a ski, snowboard, wake, skate, bike, surf, camp, and clothing online retailer with physical stores in Seattle, Portland, Denver, Salt Lake City, Whistler, and Snoqualmie Pass. Our goal is to provide you with great information to make both your purchase and upkeep easy.
evo also likes to travel to remote places across the globe in search of world-class powder turns, epic waves, or legendary mountain biking locations through evoTrip Adventure Travel Trips. Or, if you prefer to travel on your own, check out our ski & snowboard resort travel guides and mountain bike trail guides.
Still have questions? Please call our customer care team at 1.866.386.1590 during Customer Care Hours. They can help you find the right setup to fit your needs.