Alpine Touring Tips & Backcountry Basics: How to Skin
Alpine touring, or skinning, definitely has a bit of a learning curve to it. There are a few things that don’t seem intuitive at first and require a bit of practice to get figured out. But overall, it’s not as daunting a task as it might seem. With a little help and maybe some practice on the sledding hill, you’ll be cruising up the skin track no problem.
How to Put on Skins
Before you can start skinning, the first thing you have to do is put on your skins. If you’re just taking them out of the box, chances are you will have to trim them down to size. Head over to our How to Trim Climbing Skins guide for an in-depth look at how that’s done (don’t worry, it’s not too hard). Once your skins are trimmed to perfectly fit your skis or splitboard, putting them on is as easy as one, two, three.
1. Secure the tip loop or clips around the tip of the ski. Make sure it’s a snug fit.
2. Stretch the skin down the length of the ski, keeping it centered so that both edges remain visible. Slide your hand firmly down the skins as you go, ensuring the skin sticks to the base.
3. Clip the tail hardware to the back of the ski, making sure you keep tension in the skin so the end result is taut and secure.
Setting a Skintrack on Skis
Chances are, wherever you're heading to go earn some turns, you won’t be the only one out there. Since many people are using the same trailheads to get to the same zones, often following summertime hiking trails, a beaten down path forms in the snow. This is called a skin track. Following a skin track gives you less resistance while you hike, and almost always offers an easier time than going rogue. Be sure not to just follow blindly, however, as you never know who set the track, what their comfort levels were, and whether they knew where they were going.If you’re venturing off the beaten track to zones untraveled, or are the first one heading out after a storm, you will have to break your own trail. One group member will lead the way, and the rest will follow in their tracks. It’s good practice to trade off trail breaking duties every once in a while, so no one gets too tired doing all the work. Before forging on ahead, however, the first step is to make sure you really know what you’re doing. If no one else has gone this way before you, there’s more often than not a good reason why. Are you sure you’re making a safe decision?
Some final pieces of skin track etiquette: if you have to bootpack for some reason, walk along side of the track as opposed to on it, so your post holing won’t ruin the track for everyone else. Lastly, don’t let your dog (or your friend) do their business on the skin track. That’s just gross, dude!
Ski Skinning Technique & Tips
Okay, so you’ve found the skin track, your beacon is beeping, your boots are in walk mode, and you’re facing up the hill. Now all that’s left to do is put one foot in front of the other and start walking. While there are plenty of intricacies to be mindful of, skinning really is just like walking on a trail for the most part. Skiing with proper technique will help you go farther and faster. Here are some key tips to help your first tour go smoothly:
- Instead of picking up your feet, it’s more efficient to slide or shuffle your skis forward without ever lifting them off the snow.
- Your skins are designed to slip forward but not back, so the more forward glide you can get from each “step,” the more energy you will save in the long run.
- Aim for a long, smooth, and rhythmic stride when possible. Just like with hiking, it helps to develop a rhythm of skinning and breathing, for instance inhaling on each forward step.
- When breaking trail, try to keep your line of ascent smooth, consistent, and not overly steep – look ahead and plan your line around trees and rocks before you get there so you don’t have to make last minute corrections. When uphill kickturns (read below) are necessary, try to space them well apart if you can.
- Shorten your stride when it gets steep or the traction gets sketchy.
- When you feel yourself slipping backwards, concentrate on standing up straight and weighting your heels just in back of your bindings – this is where the bulk of your climbing traction comes from. Think of pulling your toes up and driving with your heels while skinning on steeper slopes.
- If you find yourself on a sidehill with lots of pressure on the very edge of your skis, it often helps to relax and roll your ankles slightly so that you have more skin in contact with the snow surface.
- On short downhill sections during the climb, it's easy to let your skiing instinct take over and go into a good centered stance with your weight driving through your shins. This will cause you to hinge forward over your bindings and faceplant, which, while being hilarious for your friends, will not help you get up the mountain any faster. Instead, ski just like you're taught not to do: leaning back and keeping your heels planted firmly. Once you've built up a bit of confidence skinning, you'll be able to sort of "tele" your way down the hill, but until then, the exaggerated backseat is fine.
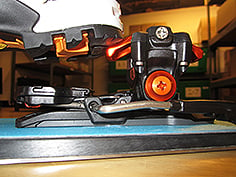
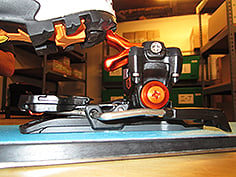
How & When to Use Your Heel Risers
Most touring bindings are equipped with heel risers that allow you to adjust the angle of your boot for skinning. As the slope gets steeper, you'll find yourself falling backward more and more, until you flip your heel riser on and magically regain composure. Most bindings have two or more levels to choose from, depending on the angle of the slope. Don’t be too scared or lazy to use these when the going gets steeper. Using the right level reduces strain on your hamstrings and makes it much easier to put weight on the rear of the ski for better grip. While risers shorten your step, they allow you to stand up straighter, adding grip and comfort on steeper terrain. Like changing gears on a bicycle before you get to a hill, anticipate terrain changes when you can and flip your risers up before you reach an especially challenging section. Adjusting them in the middle of a steep slope adds a degree of difficulty.
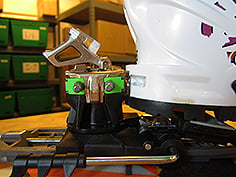
Dynafit Radical 2.0: Low
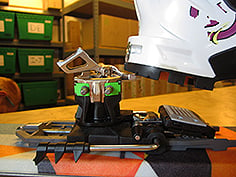
Dynafit Radical 2.0: Medium
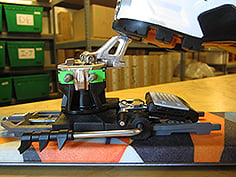
Dynafit Radical 2.0: High
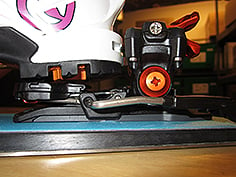
G3 Ion: Low
G3 Ion: Medium
G3 Ion: High
How to Kickturn on Skis
Steeper terrain is usually climbed in a series of gradual switchbacks at an angle that allows for better traction. This approach is more efficient and faster in the long run than skinning straight up a steep slope. When you’re traversing and run out of room, you’ll need to perform an about-face, known as a kickturn. To kick turn on skis, follow the steps below.
- Set yourself up for success. Plan where you're going to turn a few steps in advance.
- Flatten out and overshoot. Altering your path to a slightly flatter angle can help you get solid traction. Move forward until your boots are even with your new path, beginners often don't scoot up far enough.
- Get a solid footing with your downhill ski. Make sure you have a good grip, you'll be relying on your downhill ski to hold your weight.
- Flip your uphill ski around into the new path. Slide your uphill ski farther forward than you would for a normal stride, then flip it around to the new direction of travel (we told you this requires some flexibility).
- Transfer your weight to the uphill ski. Now that you’re standing with your feet facing in different directions, transfer the majority of your weight to the higher ski (the one you just flipped around) and make sure the skin is gripping (sliding the ski back a fraction of an inch helps “set” the skin). Now comes the tricky part.
- Bring the downhill ski around. Transfer all your weight to the uphill ski and straighten your lower leg while bringing it alongside the upper one. It can help to tap your heel sharply on the heelpiece of the downhill ski and let the tip of the ski pivot upward toward your knee before bringing this ski into line with the other and take another stride in the same motion.
It helps to watch experienced skiers do this a few times in slow motion if you can get them to demonstrate. Different skiers have different techniques for this crux move and you may find one or the other better suited to you. Check out this demonstration below to get a clearer idea of the steps.
On steeper slopes, the uphill kick turn is the most efficient way to change direction. This technique requires balance, flexibility, and sometimes a bit of nerve. Beginning ski tourers often develop a fear of this maneuver, but with a bit of practice (and a fair amount of floundering) you’ll be a pro in no time. It’s best to practice on lower angle slopes at first and work up to steeps, but the reality of alpine touring is that at some point you’ll just get stuck with skis facing two different directions on the steepest section of a climb, wondering how you got there and what to do next. But don’t sweat it, just remember the basics and work your way through. Next time will be smoother.
On steeper terrain, or in deeper snow, you sometimes don't have enough room to slide the initiating ski forward to flip it around. When this is the case, you can use this technique instead.
- Once you've gotten your downhill ski set, slide the uphill ski backward and pivot it around your lower boot in a curve until it faces in the new direction. Your skis should now be forming an “X” with one directly over the other.
- Slide the pivoting ski forward until the tail clears the lower ski. Plant it, and transfer your full weight to it.
- Bring the next ski into line with the same tap of the heel to raise the tip, and you’re on your way. Watch the demonstration below to get a better idea of how this variation on the kick turn works.
It takes a bit of experience before you’ll recognize when to use the first technique and when to use the second. Both require some practice to master, especially when the snow is deep or the grip is sketchy. Don’t give up, the people ahead of you who look like they’re doing this effortlessly didn’t learn it in one day either!
Ski Crampons
Most of the time, climbing skins and an occasional bootpack will get you up anything you want to ski down. Once in a while, however, conditions will demand a little extra grip. For traversing or sidehilling on icy spring slopes and bulletproof windcrust, when a slip means losing big chunks of hard-earned vertical (or worse), there are ski crampons. Ski crampons are aluminum teeth that attach to alpine touring bindings and allow you to grip hard snow surfaces with the tenacity of a pit bull on a mailman’s leg. They are usually specific to the brand of binding you have and must be sized correctly for the width of your ski. You might carry these in your pack without using them for most of the year, but for the few times that you need them, you'll be glad you have them. If you are planning on a heavily travelled tour with frozen, early morning starts you will want these for sure. When using ski crampons on uneven terrain, carefully placing your ski so the crampon contacts a high section of snow is critical. You can also improve the depth of the crampon's bite by setting your binding heel risers on the low or flat setting.We recommend that backcountry travelers take an AIARE Level One class or equivalent and practice the skills they learn there regularly with their partners. Here are some great resources for avalanche safety education:
— American Institute for Avalanche Research and Education
— American Avalanche Association
— Northwest Weather and Avalanche Center
— Avalanche Canada
You should carry an avalanche beacon, shovel and probe when travelling in avalanche terrain and know how to use them. Backcountry travel requires an acceptance of the risks involved (avalanches are not the only danger) and implies a willingness to take responsibility for educating oneself about these dangers and ways to mitigate them.
Learn More With Our Other Backcountry Guides:
- Backcountry Basics - How to Get Started
- Backcountry Gear - Checklist
- Backcountry Backpacks - How to Choose
- Avalanche Beacons / Transceivers - How to Choose
- Avalanche Shovels - How to Choose
- Avalanche Probes - How to Choose
- Avalanche Airbags - How to Choose
- Alpine Touring Skis - How to Choose
- Alpine Touring Ski Boots - How to Choose
- Alpine Touring Ski Bindings - How to Choose
- Dynafit (Tech) Bindings - Getting Started
- Backcountry Basics - How to Skin
- Climbing Skins - How to Choose
- Climbing Skins - Size Guide
- Climbing Skins - Weight Chart
- Climbing Skins - How to Cut/Trim
- Outerwear & Layers - How to Dress for the Backcountry
- Splitboarding - How to Get Started
Discover Our Favorite Gear:
This is evo. We are a ski, snowboard, wake, skate, bike, surf, camp, and clothing online retailer with physical stores in Seattle, Portland, Denver, Salt Lake City, Whistler, Snoqualmie Pass, and Hood River. Our goal is to provide you with great information to make both your purchase and upkeep easy.
evo also likes to travel to remote places across the globe in search of world-class powder turns, epic waves, or legendary mountain biking locations through evoTrip Adventure Travel Trips. Or, if you prefer to travel on your own, check out our ski & snowboard resort travel guides and mountain bike trail guides.
Still have questions? Please call our customer care team at 1.866.386.1590 during Customer Care Hours. They can help you find the right setup to fit your needs.